X-Carve 1000mm CNC Router
X-Carve 1000mm CNC Router
Carves wood, plastics, and materials like aluminum, Corian®, and linoleum up to 37 inches wide.
Work Area: 29.5in x 29.5in x 4.5in
Machine Footprint: 41 in x 52 in x 22 in
Maximum Passthrough Sheet Width: 37in
Weight: Approx 100lbs
All Members must take a Tool Training and Testing class before using this machine.
How to Turn on the X-Carve
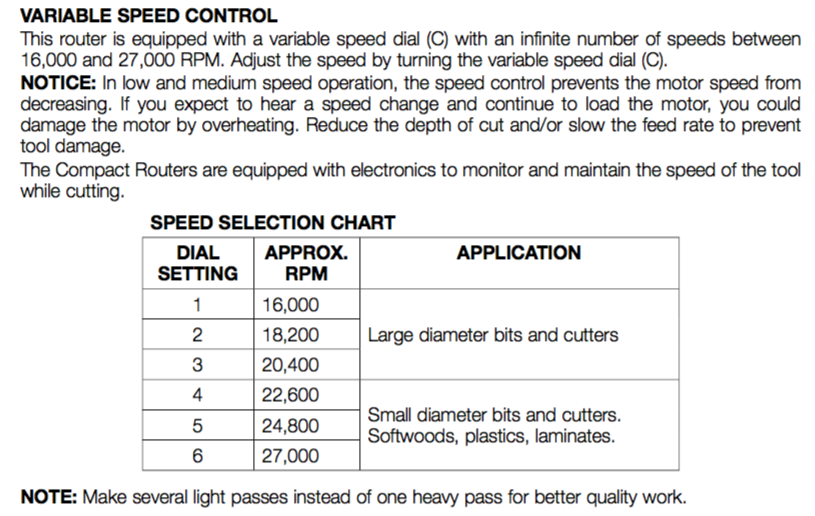
X-Carve Speeds to Chart
How to Use the X-Carve 1000mm CNC Router
We recommend using Vcarve for creating files for the X-Carve CNC router. The makerspace has licensed the Makerspace Edition of Vcarve, which means that makerspace members can generate VCarve files using a special Makerspace Client Edition of Vcarve, bring those files to the makerspace, and use the Makerspace Edition of Vcarve on the computer at the makerspace to generate the G-Code necessary to complete their CNC task.
How to Get Makerspace Pro Client Edition
Download and install VCarve Pro Trial Edition on your home computer.
Launch VCarve Pro Trial Edition.
Click on the “Sign In…” icon in the upper right hand corner of the screen.
Sign in to Vectric website using the Vectric credentials you created from the link you received in your welcome email.
Link your Vectric account to the Vcarve software as instructed.
You should now have a properly licensed copy of the Makerspace Client Edition of Vcarve.
How to Go from Design to Completed Carving
Using Vcarve Pro Makerspace Client Edition, create your design.
Select the design, and generate toolpaths using the relevant tools from the Vcarve library of tools.
Save the design to a Vcarve file with “.crv” extension.
Bring your Vcarve file to the makerspace.
Open the Vcarve file in the Vcarve Pro Makerspace Edition at the makerspace.
Navigate to Toolpaths.
Click the “Save Toolpath” button.
Choose “G-Code (mm) (*.tap) in the drop down menu, and save your G-Code to the desktop.
Walk over to the X-Carve, and turn the machine on by flicking the switch on the back of the controller. Wake-up the Raspberry Pi touchscreen by tapping it with a fingertip.
Make sure the Raspberry Pi is connected to the X-Carve. If it is not connected, connect it by hitting the Connect link, and selecting “/UBS/Inventables” in the drop-down menu.
Walk back to the computer at the Makerspace.
Open a browser, and navigate to http://xcarve.local/#/workspace
Click the “Upload G-Code” button in the interface you see in the Browser.
Select the G-Code file you generated in Step 8 above and upload it.
Walk back over the X-Carve.
Clamp your workpiece to the spoil board.
Make sure you have eye and ear protection.
Unlock the machine by clicking on the menu in the upper right and clicking “Unlock”.
Zero the machine by jogging the spindle to the lower left corner of your workpiece using the X, Y, and Z jogging buttons and clicking the respective “X=0”, “Y=0”, and “Z=0” zeroing buttons.
Turn the speed dial of the router to the appropriate setting for your job.
After the next step, the router will spring to life and begin moving. Make sure that you and everyone else is safely out of range of the cutting tool.
Click the “Run G-Code” button on the X-Carve touch interface. Place your hand on the emergency stop button, ready to push the button in case any issues arise.
After the job is complete, turn off the router.
Turn off the X-Carve controller.


